Get started with the Logic Pro main window
The Logic Pro main window is where you work on your projects. You can access all of the major working areas of Logic Pro in the main window.

The central part of the main window is the Tracks area. You record and arrange the musical material in your project on the tracks in the Tracks area. There are several different track types, including audio, software instrument, and Drummer tracks. When you make a recording, or add an Apple Loop or other media file, it appears as a rectangular region on the selected track.
Across the top of the main window is the control bar, which includes buttons that let you access different parts of Logic Pro, transport controls for controlling project playback, a Master Volume slider to adjust the overall project volume, and other controls. In the center of the control bar is the LCD, where you can view the current playhead position, move the playhead, and set the project tempo, key, and time signature.
To start working with audio tracks, see Get started with audio tracks. To start working with software instrument tracks, see Get started with software instrument tracks. To start working with your recordings and other material in the Tracks area, see Get started arranging regions in the Tracks area.
You can open the following working areas of Logic Pro by clicking their buttons in the control bar:

-
 Library: You can audition patches and choose a patch for the selected track in the Library. A patch contains the instrument, effects, and routing settings that control the sound of a track. When you choose a patch, those settings are applied to the currently selected track. The Library shows available patches for the selected track. You can choose a category on the left to see available patches or subcategories on the right.

In addition to patches, you can view and select plug-in presets and other settings in the Library, when the corresponding item is selected. For information about choosing patches and other items in the Library, see Patches overview.
-
 Inspector: You can view and edit parameters for the selected region, the selected track, and other items in the inspector. The available inspectors and parameters change, depending on which working area has focus, and what is selected. The channel strips for the selected track and its output appear in the lower part of the inspector, so you can view and quickly edit channel strip parameters and plug-ins.

The Quick Help area at the top of the inspector shows a brief description of whatever part of the Logic Pro interface you move the pointer over. Some Quick Help descriptions contain links to more detailed information.
For information about editing region and track parameters, see Region inspector and Edit track parameters.
-
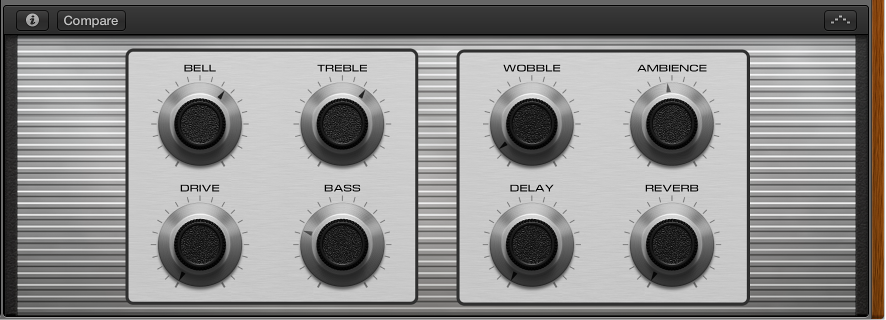
 Smart Controls: Smart Controls let you quickly adjust the sound of the selected track using a set of onscreen controls. When you open the Smart Controls pane, you see the screen controls for the the selected track. Screen controls can control both channel strip and plug-in parameters, including software instruments and effects. Move the knobs and other screen controls, and hear how sound changes.
To start working with Smart Controls, see Get started with Smart Controls. For more information, see Smart Controls overview.
-
 Mixer: The Mixer is where you adjust volume, pan, and other channel strip settings, mute and solo channel strips, add and edit plug-ins assigned to a channel strip, and control the signal flow of your project.

The Mixer shows the channel strips for every track in your project, including auxiliary and output channel strips, and the master channel strip. This makes it easy to see and adjust relative levels and other track settings. You can adjust the level and pan position of each channel strip, insert instrument and effect plug-ins and edit their parameters, mute and solo tracks, and send the output to auxiliary or output channel strips.
To start working in the Mixer, see Get started with mixing. For more information, see Mixing overview.
-
 Editors: Logic Pro includes a set of a set of editors you can use to edit individual tracks and regions, and manipulate their contents precisely. The available editors depend on the type of track or region selected.

-
The Piano Roll Editor shows notes in selected MIDI regions on software instrument (or external MIDI instrument) tracks. Each note appears as a bar that indicates the point in time where it starts playing, how long the note plays, and the note’s pitch.
To start working in the Piano Roll Editor, see Get started with the Piano Roll Editor. For more information, see Piano Roll Editor overview.
-
The Audio Track Editor displays the audio waveform of the regions on an audio track. In the Audio Track Editor, you can copy, paste, move, trim, split, and join audio regions. You can also quantize and edit the timing and pitch of audio material using Flex Time and Flex Pitch.
To start working in the Audio Track Editor, see Get started with the Audio Track Editor. For more information, see Audio Track Editor overview and Flex Time and Pitch overview.
-
The Score Editor displays MIDI regions in a project as music notation, including notes, rests, and other MIDI events such as sustain pedal markings. You can add and edit notes and other musical symbols.
For more information about the Score Editor, see Score Editor overview.
-
-
 Loop Browser: Logic Pro includes an extensive collection of prerecorded Apple Loops that you can add to your projects. You browse or search for loops in the Loop Browser, where you can preview them to choose the ones you want to use.

To start working with Apple Loops, see Get started with Apple Loops. For more information, see What are Apple Loops?.
-
 Media Browser: Browse your computer and connected storage devices for audio files and movies.

For more information about working with media files, see Prerecorded media overview.
![]() When Show Advanced Tools is selected in the Advanced preferences pane, additional features, browsers, and editors are available.
When Show Advanced Tools is selected in the Advanced preferences pane, additional features, browsers, and editors are available.