General Audio preferences
The General Audio pane contains the following preferences:
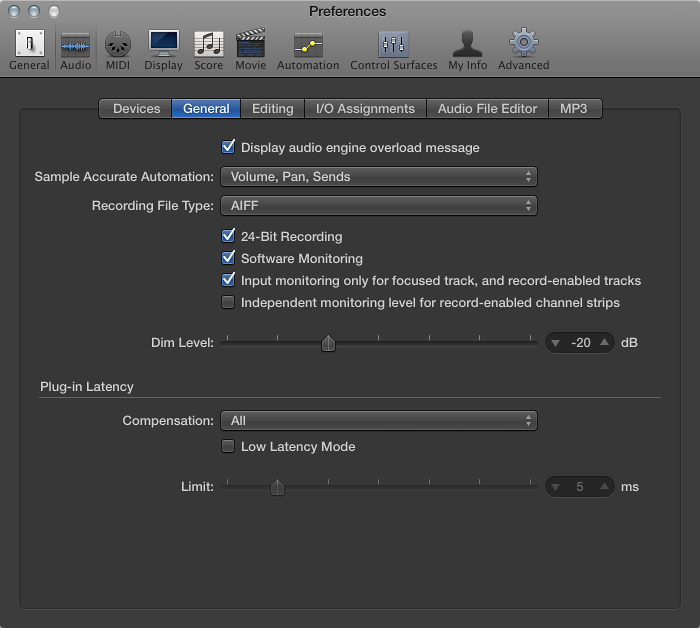
![]() When Show Advanced Tools is selected in Advanced preferences, the following are available:
When Show Advanced Tools is selected in Advanced preferences, the following are available:
“Display audio engine overload message” checkbox: When selected, displays an alert message in an overload situation. Otherwise, playback will simply stop without displaying an alert.
-
Recording File Type pop-up menu: Determines the file type for recorded audio.
AIFF: Cannot handle audio file recordings larger than 2 GB.
WAVE (BWF): The most common audio format on Windows PC computers. Files are stored as Broadcast Wave files, which contain timestamp information in the file header. The WAV file format cannot handle audio file recordings larger than 4 GB.
CAF: Choose this setting if you’re going to record files larger than 4 GB.
-
24-Bit Recording checkbox: When selected, Logic Pro can record 24-bit files. 20- or 24-bit recordings offer a significant improvement in the available dynamic range, but require high-quality peripheral components such as microphones and pre-amps, not to mention high-quality analog-to-digital/digital-to-analog converters. 20- and 24-bit files use one-and-a-half times the disk space of comparable 16-bit files.
Note: Selecting this option only makes sense if you’re using a 20- or 24-bit interface.
-
Software Monitoring checkbox: Turns software monitoring on or off. In most situations, you should leave it on (default).
Note: When Software Monitoring is on, the audio signal is processed via software, and a certain amount of audible delay (commonly referred to as latency) is inevitable.
If you’re listening to the recorded signal through your mixing console, or your audio interface supports hardware monitoring, you should turn this option off.
“Input monitoring only for focused track, and record-enabled tracks” checkbox: Turns software monitoring on or off for the focused track in the Tracks area. This is on by default. This allows you to hear incoming audio, during playback or recording, for the selected track only.
-
“Independent monitoring level for record-enabled channel strips” checkbox: Allows the use of an independent monitoring level for record-enabled audio channel strips. This is off by default. After record-enabling a track, you can adjust the fader to the level you like. The original level will be restored when you deselect the Record Enable button.
Note: Adjustments to the fader do not affect the recording level; they only affect the monitoring level.
DIM Level slider: Sets a discrete level for the Dim function. You can set a dim level from 0 dB to –30 dB. The level chosen here is used when the Dim button is activated from the Master channel strip.
-
Plug-in Latency Compensation pop-up menu: Compensates for audio delays that can be introduced when using plug-ins. Plug-in latency compensation (also called plug-in delay compensation) is useful for software effects plug-ins, and is particularly important for DSP (digital signal processing) accelerator hardware (for example, TC PowerCore and Universal Audio UAD1).
Use the pop-up menu to activate plug-in latency compensation for either:
Audio and software instrument tracks
All (audio, instrument, auxiliary, and output channel strips)
You can also turn off compensation entirely.
Low Latency Mode checkbox and Limit slider: You need to select the Low Latency Mode checkbox in order to turn on Low Latency mode and use the Limit slider. The Limit slider lets you determine a maximum amount of allowable delay that can be caused by plug-ins when Low Latency mode is turned on (by clicking the Low Latency Mode button in the control bar). In Low Latency mode, plug-ins are bypassed to ensure that all delays (across the entire signal flow of the current track) remain under the Limit slider value. This is useful when you want to play a software instrument with several latency-inducing plug-ins inserted in the channel.
![]() When Advanced Editing is selected in Advanced preferences, the following is available:
When Advanced Editing is selected in Advanced preferences, the following is available:
-
Sample Accurate Automation pop-up menu: Determines which parameters, if any, are automated with sample accuracy. This type of automation is very processor intensive. It places higher overheads on system resources, which may affect performance (depending on the nature of your projects, and available computing power). This is most likely to happen during heavy project sections where a lot of software instruments and effects are in use. Logic Pro offers three settings:
Off: Minimal overhead on computer performance for automation playback. Automation is less precise when this setting is active.
Volume, Pan, Sends: Only these parameters are automated with sample accuracy.
Volume, Pan, Sends, Plug-in Parameters: All of these parameters are automated with sample accuracy. Not all Audio Units plug-ins can be automated in this way.