General Synchronization settings
![]() General Synchronization settings are only available when Show Advanced Tools is selected in Advanced preferences.
General Synchronization settings are only available when Show Advanced Tools is selected in Advanced preferences.
These settings are used when running Logic Pro as a slave—when Logic Pro is being controlled by another device.
-
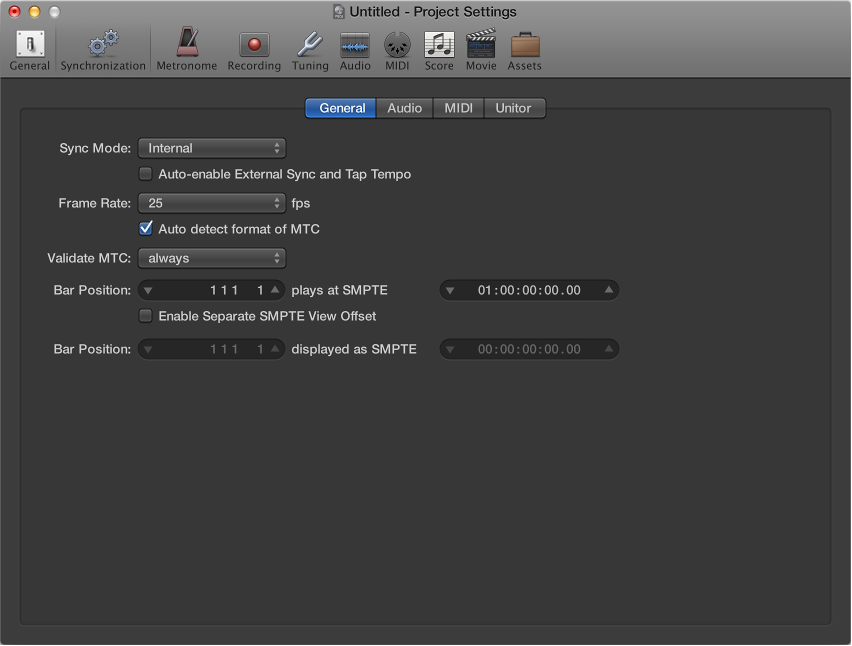
Sync Mode pop-up menu: Defines the master (timecode type) that Logic Pro is synchronized to.
Internal: Selects the internal timer of Logic Pro, with Logic Pro running as the master. External devices can be synchronized via MIDI Clock or MTC.
MTC: Selects MIDI Time Code mode, with Logic Pro running as a slave. MIDI timecode can either arrive at a MIDI In port, or be generated by a MIDI interface that translates it from incoming SMPTE timecode—the Unitor8, for example.
Manual: Selects Tempo Interpreter mode, with Logic Pro running as a slave to impulses that are recognized as valid beats by the Tempo Interpreter. The parameters that control how Logic Pro responds to Tap Tempo commands can be found in the Tempo Interpreter window.
-
Auto-enable External Sync and Tap Tempo checkbox: When selected, Logic Pro runs as the master until it receives a synchronization signal—either in the form of MTC, or from the Tempo Interpreter.
Logic Pro automatically locks to the first synchronization signal it receives.
Important: Make sure that different synchronization signals don’t arrive simultaneously; remember that there can only be one timecode master.
-
Frame Rate pop-up menu: Defines the frame rate, which applies to both transmitted and received timecode.
Note: In drop frame formats, certain frames are left out. (This follows a regular pattern.) To distinguish between formats, those without dropped frames are sometimes referred to as NDF or non–drop frame.
24 fps: Film, high definition video
25 fps: PAL video/television broadcasts
30 fps (drop frame): NTSC video/television broadcast; rarely used
30 fps: High definition video; early black-and-white NTSC video; an older rate that is rarely used today
29.97 fps (drop frame): NTSC video/television broadcasts
29.97 fps: Standard definition NTSC
23.976 fps: 24 fps running at 99.9%, which facilitates easier transfer of film to NTSC video
-
Auto detect format of MTC checkbox: When selected (recommended), the incoming timecode is analyzed and the correct frame rate set automatically.
Note that it’s not possible to automatically distinguish between the 29.97 and 30 fps MTC frame rates:
The MTC standard does not allow a distinction.
A measured rate of 30 fps could also be 29.97 fps timecode running too fast, and vice versa.
Logic Pro automatically interprets frame rates of “approximately 30 fps” as either 29.97 (drop frame) or 30 fps (non-drop frame), depending on whether or not the drop frame format is used. This interpretation will usually be correct, because these two formats are used as a standard.
The “Auto detect format of MTC” option only switches to 29.97 (drop frame) or 30 fps (non-drop frame) if one of the other conventional formats was previously set. If you want to synchronize Logic Pro to one of these nonconventional frame rates, you need to define the format manually. This setting will not be altered by the “Auto detect format of MTC” function.
Validate MTC pop-up menu: Specifies how often Logic Pro checks for incoming timecode, in order to ensure synchronization integrity. In general, you should leave this option on “always.” There are some devices that generate timecode pulses that may require a specific number of frames to be set, in order to maintain synchronization.
-
Bar Position plays at SMPTE sliders: Defines the SMPTE offset for the project. As projects don’t always need to start precisely at bar 1, you can select any bar position to be played at the set SMPTE time.
The default is Bar Position: 1 1 1 1 plays as SMPTE 01:00:00:00.
The SMPTE offset of 01:00:00:00 (one hour) is normally used, because it allows you to pre-roll an amount of timecode.
Enable Separate SMPTE View Offset checkbox: Shows the absolute time from the start of the project in the time display, rather than the actual SMPTE time.
-
Bar Position displayed as SMPTE sliders: Becomes available if you select the Enable Separate SMPTE View Offset checkbox. Choose Bar Position 1 1 1 1 displayed as SMPTE 00:00:00:00 (preset). If necessary, you can set other view offset values here.
The Tempo List always shows the real SMPTE time, never the SMPTE View Offset. The SMPTE View Offset is used in all other windows (including the control bar).
Tip: It’s common practice in many video (and audio) post-production houses to set a one-hour SMPTE offset (01:00:00:00). This avoids a problem commonly referred to as midnight, where a pre-roll passes through SMPTE time 00:00:00:00, which causes issues with some tape machines (such as the ADAT).